Hey, Veeam fans! Welcome to my blog post series on Hyper-V Management. Today we will look at Hyper-V administration best practices. Now, whenever I am talking with customers and attendees at conferences, best practices are always some of the most popular topics. So, in this blog post, I will give you three of my favorite best practices for Hyper-V administration.
Changing the default storage location for Hyper-V
When working with Hyper-V, one of the most annoying things for an administrator is the default storage location for Hyper-V virtual machines. Have a look at the screenshot below and the default virtual machine path.

This can be quite problematic for the administrator that just wants to click next, next, next and finish to create a virtual machine. All of a sudden you end up with a ton of virtual machines running in C:\ProgramData\Microsoft\Windows\Hyper-V\….

In the screen shot above you can see that a new working folder has been created for our “Veeam HVAdmin01” virtual machine. In our case this is actually a big problem for this Hyper-V host because we have our Boot Drive C: storage on a Boot DOM (Dongle on Mother Board) which is only 64 GB in size. Running this VM would quickly run our Boot/System Drive out of space and cause our Hyper-V host to eventually crash.
You’ll need extra storage for your VMs but the fix for this problem is simple –– change the default path in Hyper-V Manager\Hyper-V Settings. You can see the settings in the screen shot below.

Integration services “drift”
One of the biggest issues with any virtualization farm running either Hyper-V or VMware vSphere is the management of the VM Integration Services (Hyper-V) or VMware Tools (VMware). Prior to Windows Server 2016 you had to manually update your integration services by inserting the integration services disk and running the updates. This was a massive pain especially when working with larger environments.
So, how can we tell if we are up to date with our integration services? One super easy way to do this is with a little piece of PowerShell code written by Ben Armstrong (@VirtualPCGuy).
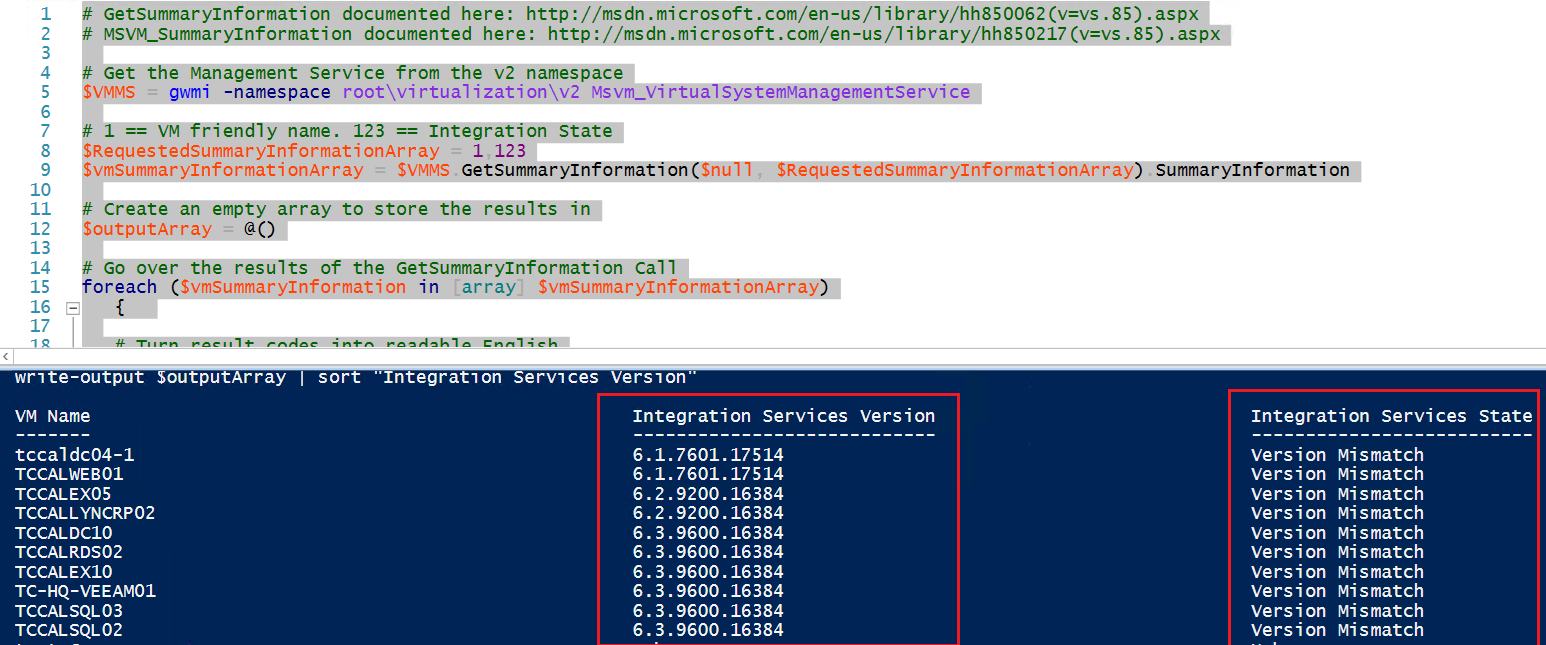
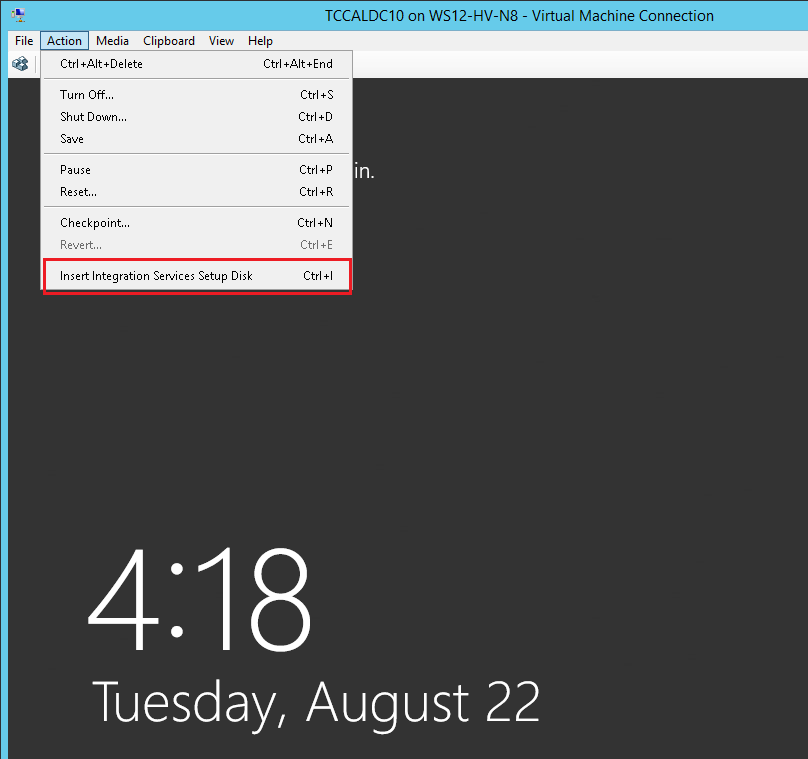
After you have detected which virtual machines have a “Version Mismatch” simply update the integrated services in Hyper-V. In Windows Server 2012 R2 you would open the virtual machine console, click Action and select Insert Integration Services Setup Disk.
Then just log on to the virtual machine, browse to the integrated services DVD drive letter and run .\support\xxx\setup.exe. If the integration services version requires an update you will see the screen shot below. Simply click OK and then reboot to complete the installation.

The process for updating integration services has been greatly simplified for Windows Server 2016 Hyper-V as it is handled via Windows Updates. You can see that the Insert Integration Services Setup Disk option is missing per the screen shot below.

Now, with Windows Server 2016 Microsoft has simplified this process –– just run Windows Update inside of the virtual machine to fully update the integration services.
Hyper-V Daily Health Check Report
As a seasoned Hyper-V administrator, one of the most important operational tasks is monitoring our Hyper-V Farms. A daily health check report is extremely key and my personal favorite comes from the Technet Gallery called the Hyper-V Reporting Script.
The output of this report can be extremely useful as seen in the screenshot below.

It can also be set up to run as a schedule task with parameters to email the report to the operations team.
One of the issues with this report is that it is set up to only run on up to Windows Server 2012 R2. A workaround to this is to modify line 849 by adding $OSversion -Like “10.0*”

I hope you enjoyed this post and now your Hyper-V management routine will be less of a hassle!
