|
Ch.1 — Plain OS installation |
Introduction
In the previous posts of this multi-post blog series, I highlighted the basic installation of Windows Server 2016 as well as a brand new, slightly more advanced approach to upgrade your Hyper-V Cluster to the latest iteration of Windows Server 2016. Windows Server 2016 is set to become generally available (GA) at some point this year. Over the course of the last few months, Microsoft has been releasing Technical Preview versions of Windows Server 2016 with the current TP being version 5 (TP5). If you have not begun testing Windows Server 2016, my question is what are you waiting for? This blog post series arms you with all the tools needed to get up and running on Windows Server 2016 in an extremely easy fashion.
NOTE: Technical preview versions of software packages are provided before the final release of a product so IT pros can learn and test new features and functionality and provide development teams with active feedback. In addition, companies, such as Microsoft in this case, are able to gather insight into additional use cases that might not have been considered earlier.
This blog post will wrap up the series and focus on completing the Rolling Cluster OS Upgrade process from the previous post by adding in the necessary details required to:
- Upgrade the Cluster Functional Level
- Upgrade the VM Hardware Version
Let’s go for it!
Completing the Rolling Cluster OS Upgrade
Before we jump into upgrading our Cluster Functional Level and VM Hardware Versions, let’s quickly recap. Version 8 of a Windows Server Cluster indicates that features and functionality of Windows Server 2012 R2 are in place, whereas a Version 9 Cluster Functional Level represents Windows Server 2016. Utilize the Get-Cluster | select ClusterFunctionalLevel PowerShell to obtain the level of YOUR cluster.
Get-Cluster | select ClusterFunctionalLevel
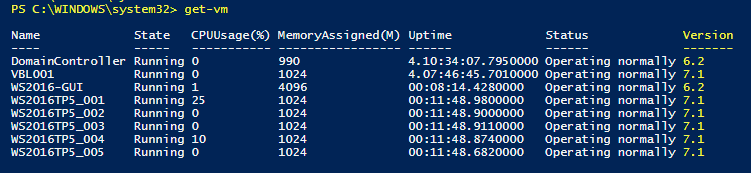
The Get-VM PowerShell command, when run directly on the Hyper-V hosts, returns the necessary information which indicates the Hardware Version our VMs are currently set at.
Get-VM
Now we’re ready to upgrade the Cluster Functional Level of our 5 Node Hyper-V Cluster since all of the hosts have been “upgraded” to Server 2016 TP5. The upgrade procedure as outlined in the second post of our series is comprised of a multi-step process. To begin the upgrade of the Cluster Functional Level, execute the PowerShell command. As an option, the -Force parameter will bypass the confirmation prompt and execute the command immediately.
Get-Cluster -Name localdemo.demo.local | Update-ClusterFunctionalLevel

The screen capture above illustrates the prompt and recognition that this process is not reversible, however, it is quite a simple procedure. At this point, an administrator still needs to upgrade the hardware versions of the VMs that will be running on these Hyper-V Hosts. Some of the new features are only available to VMs running VM Hardware version 7.1 (Latest hardware version for TP5). For example, RCT (Resilient Change Tracking) is a new feature of Hyper-V 2016 that provides native change block tracking for backup software vendors to take advantage of. Only once the VM Hardware Version is 7.1 will this feature become available.
Hyper-V VM hardware versions can be upgraded by first backing up the VM and Application, turning off the virtual machines, and then executing the Update-VMVersion PowerShell cmdlet. This PowerShell command will subsequently update the virtual machine version, and enable new Hyper-V features. This PowerShell command can be run from the Hyper-V node that is hosting the VM or executed remotely via PowerShell with the use of the –ComputerName parameter. As we can see in the screenshot below, upgrading the VM Hardware Version is an irreversible process that DOES require the VM to be powered off. Again the optional -Force parameter will bypass the confirmation prompt and execute the command immediately.
Update-VMVersion -ComputerName VMName

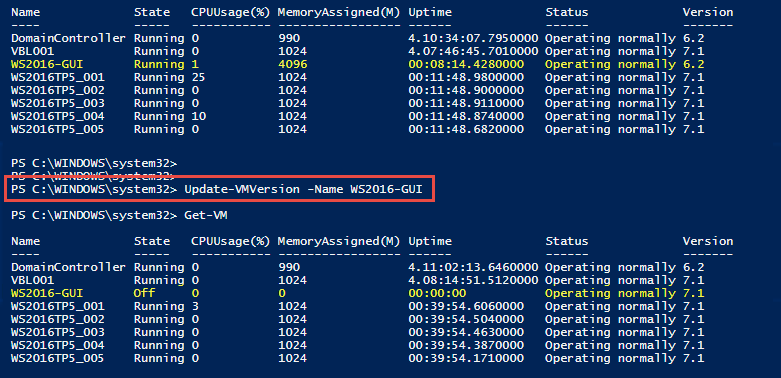
The resulting output provides confirmation that the VM Hardware Version has been upgraded. The entire process of upgrading the VM Hardware Version takes just a few seconds to complete, however, note this does require the VMs to be powered off before execution.
Conclusion
Getting your environment upgraded to Windows Server 2016 can be a pain-free process if the correct steps to reduce risk in the environment are followed. If you’ve not had the chance to begin testing Server 2016 in your environment, there’s no better time than now! What testing have you done? Is Nano Server an area of interest? What about Windows Server Containers? Let me know what Windows Server and Hyper-V 2016 topics you’re interested in reading about.
